
Favorite images from trips throughout 2021


Favorite images from trips throughout 2021
Last updated March 3, 2023

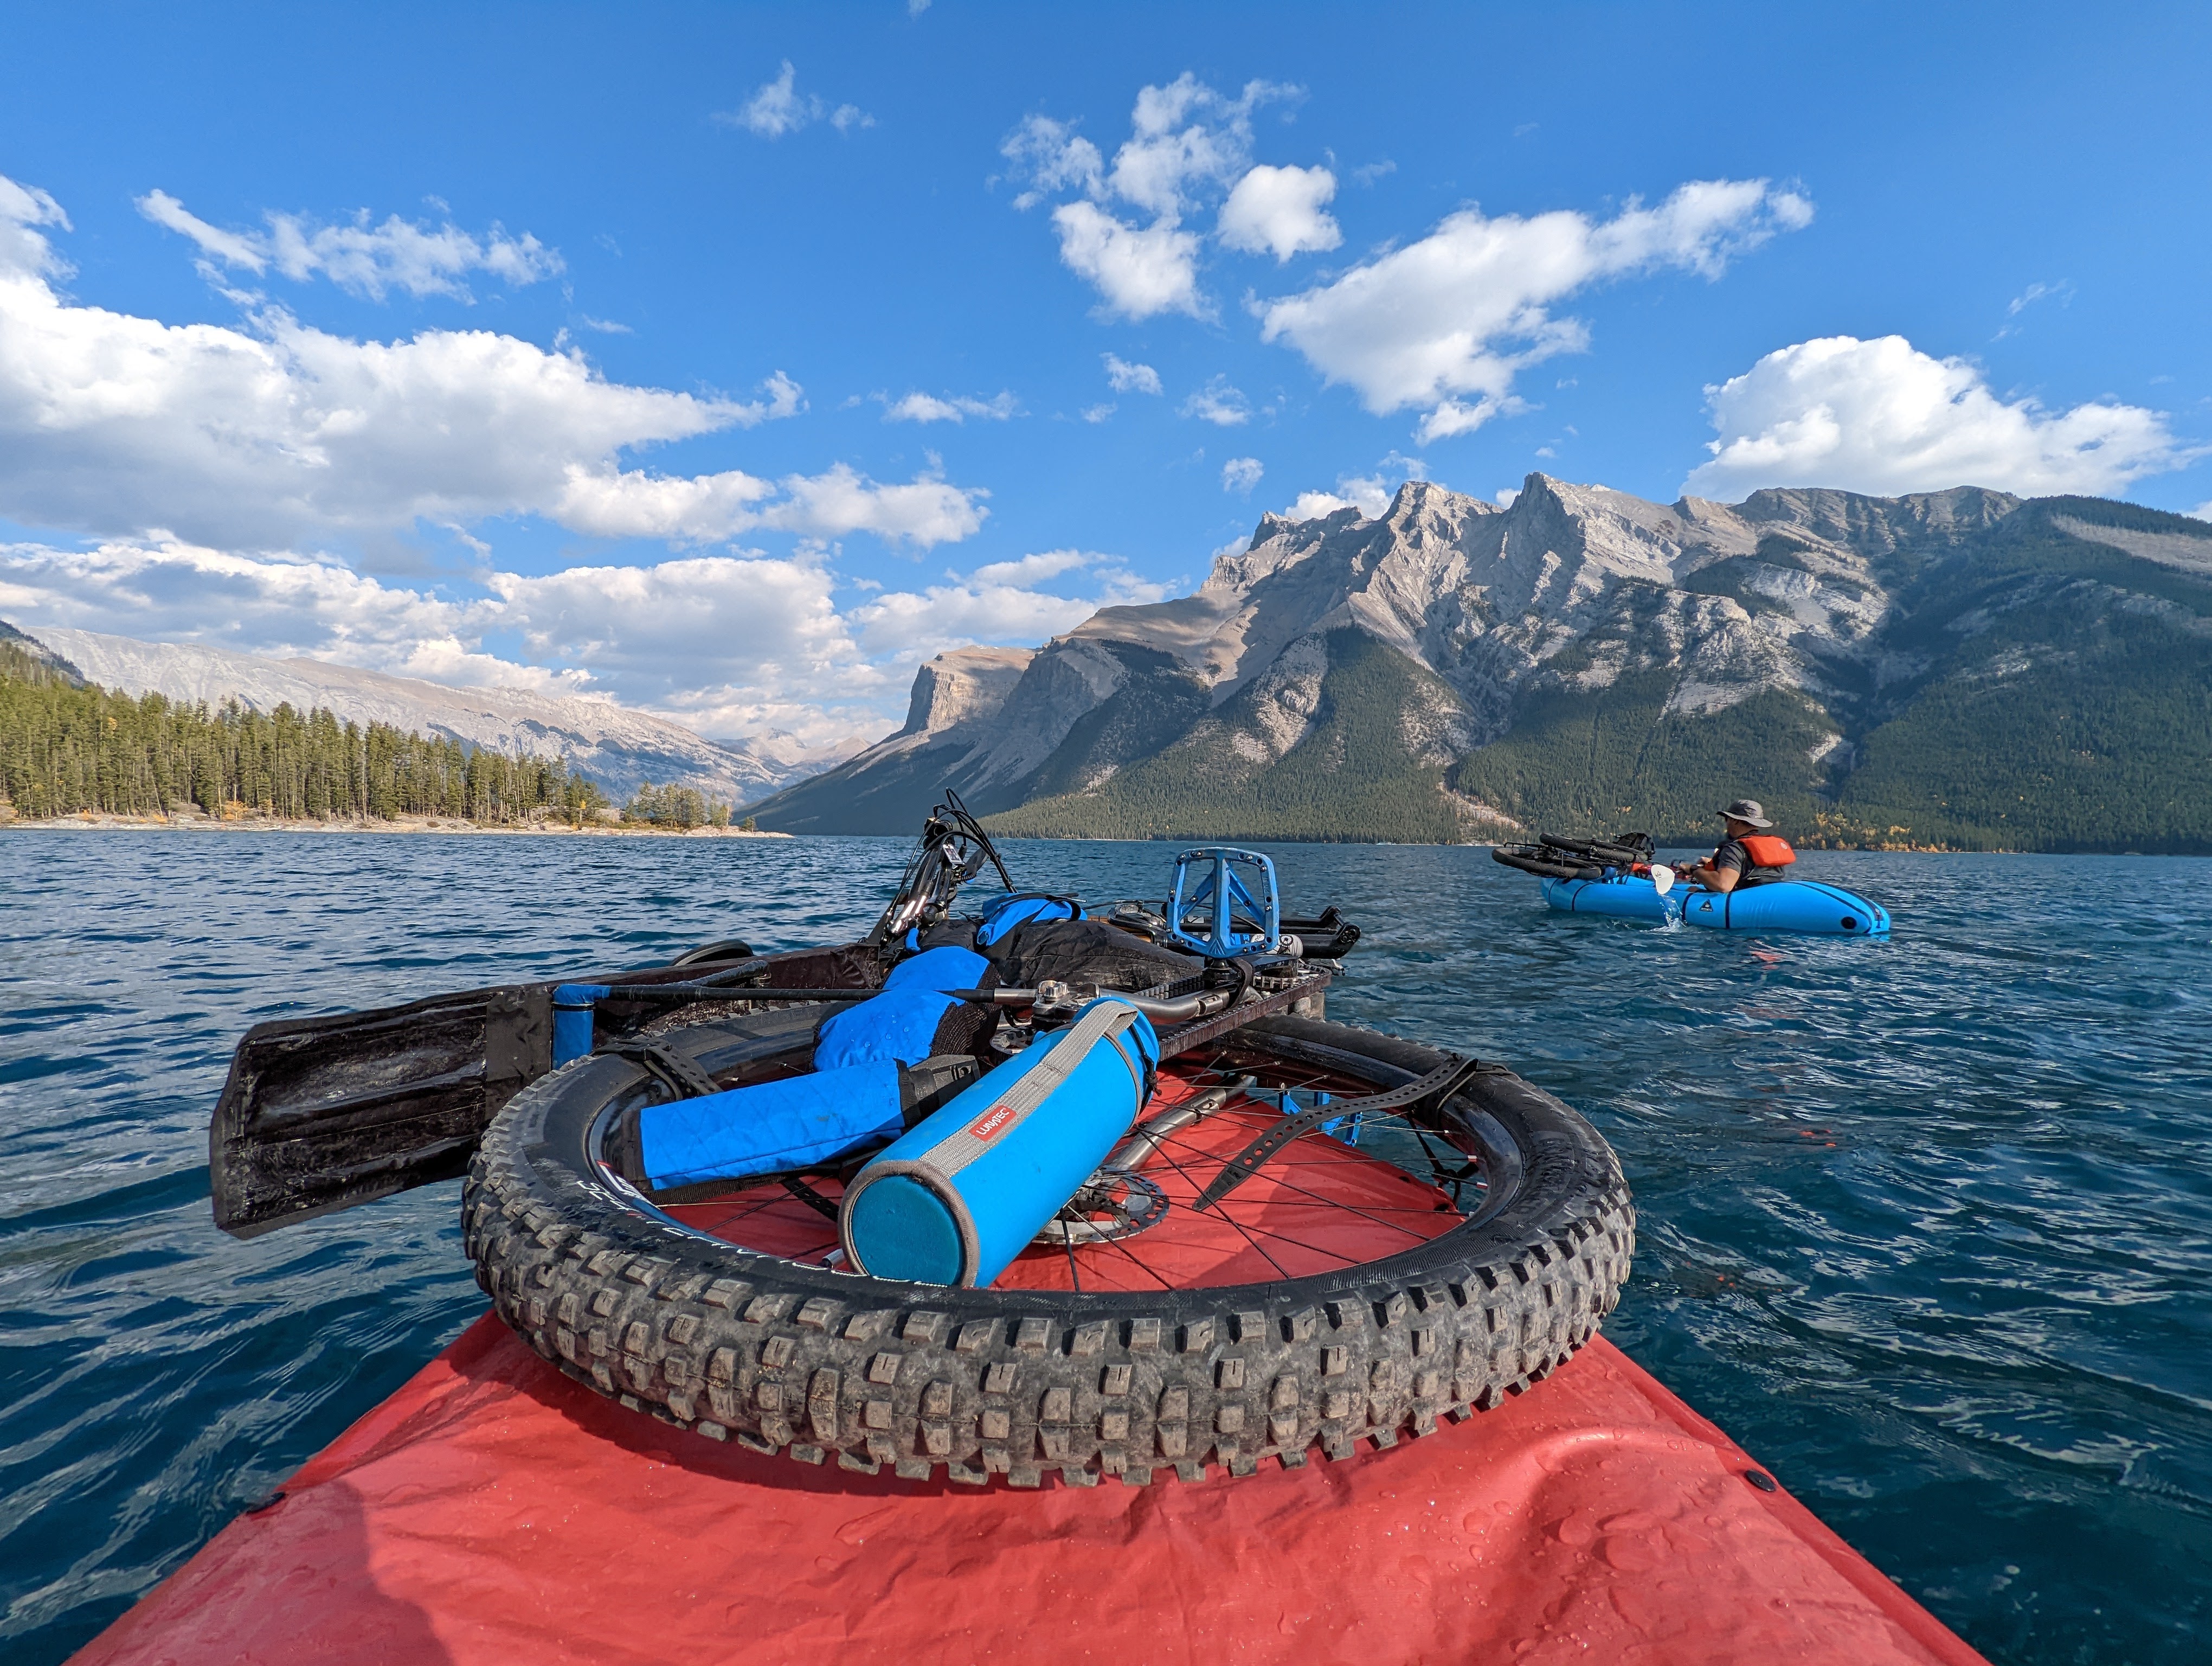
I’ve been using this loading method since Spring 2020 and am happy with stability, tracking, paddle reach, and relatively low windage. Here’s how I distribute the mass of the bike and gear on the loaded packraft. Approximately 11 % in the front third, 9 % in the aft third, and 80% (including paddler) in the centre third.
A – Bike frame/fork/handlebars, rear wheel, and rear rack with empty panniers, frame bags. 11.2 kg. This weight is considered centered over the front third of the packraft.
B – Blue waterproof deck bag/backpack, and 750 ml Aquabot bottle. 4.2 kg. Approximately centered in the hull with the exact location on rear wheel determined by raft trim in the water. (in this on-water picture I had the deck bag between my calves/knees)
C – Inside the packraft hull and evenly distributed AND secured just behind the paddlers hips. Tent 1.0 kg, sleeping system 1.1 kg, stove & fuel 0.6kg, food bag 1.6 kg, 2 litres of water 2.2 kg, bike helmet & Scarpa riding boots 1.5 kg.
D – Front wheel of bike, double-strapped to the stern of the packraft. 2.3 kg.
E – Paddler wearing a drysuit (not pictured), PFD, NRS boots, etc. 74 kg.
– The presented bike, raft, and all gear & 2.7 litres of water weighed 29.9 kg on March 1, 2023


This PDF file is from a presentation and interactive demo given to the Bow Waters Canoe Club on March 1, 2023.
Recommended resources:
– The Packraft Handbook – Awarding winning guide book by my friend Luc Mehl.
– Adventure Smart – Canadian trip planning website and companion smartphone app. A good resource and great time-saver.
– Things to Luc At (website) – I’ve taken both the on-line trip planning and Wild Ice courses. Simply excellent! I’m planning on taking the Paddle Up a Level course also.
– American Packrafting Assoc. – whitewater focus
– Alpacka Rafts (website)
– DIY Packraft (website)
direct link to Matt Pope’s blog on packraft selection. Excellent!
direct link to Matt’s video overview of DIY packrafts.
direct link to the Telkwa raft shown in my presentation
in 2020 Matt did a solo month long hike and packraft traverse of the length of Vancouver Island and published a series of videos, blog, and gear lists. Totally bad-ass!!!
– Four Corners Guides (website) Colorado based bikerafting guides. Well worth a look!
– Bikepackers Foundry – Unique ultralight gear, DIY ideas, and blog. (full disclosure – this is my adult daughter Sara’s bikepacking business)
direct link to some of the Telkwa modifications made
Here’s a link to a Ride With GPS Ride Report of a Fall 2022 bikerafting trip.

Packing a Rollingdale hardtail adventure bike for “no-backpack” bikerafting. Total weight of bike, raft and all gear with food and 3 litres of water is around 65 pounds. The numbers and descriptions immediately below match the numbers in the subsequent photos.
1. Bikepackers Foundry downtube FenderBag MSR – Carbon Reflex 1 tent and DIY full footprint, spare bottle of fuel in bottom of bag.
2. Bikepackers Foundry StraddleBags (left & right) – smartphone tripod, buff, bear spray, Park tool, nitrile gloves, lock, bug net hood; extra space.
3. Bikepackers Foundry custom white full-length top tube bag – InReach w/padded case, 1 litre Aquabot by Lunatech, sunglasses in hard case, ~2,000 calories of nuts, dried fruit, candied ginger, sunscreen, OR folding cap, water purification tablets; extra space.
4. DIY left pannier – 3-4 days of freeze-dried meals, long-handled Ti spoon, toiletries, bear-hang kit, extra snacks & emergency food, first-aid kit, spare headlamp, all in OR zipper bag; black zipper bag with all PD cache batteries, cables, spare bike light, knife; Sea to Summit ultrasil backpack containing hooded down jacket, Gore Tex hooded rain jacket and full-zip rain pants, insulated vest, Gore Tex overmitts, spare gloves.
5. DIY Framebag – spare Carbon Drive belt, Leyzne mini floor pump, tools and spares for bike, MSR 2 litre water bladder, GSI nesting bowls and small camp towel with MSR Reactor stove with fuel bottle and lighter; extra space.
6. Top of DIY rear rack – Salsa EXP dry bag containing; flat folded ThermaRest NeoAir XTherm wide sleeping pad, OR compression dry bag containing regular ThermaRest Hyperion -6 C 900 fill-power sleeping bag, Sea to Summit pillow and inflation pump with adaptor hose, merino top, bottom, & boxers, spare compression socks, RAB down booties, RAB down pants, OR down beanie.
7. DIY right pannier – raft repair kit, combo throwline and bailer, spare straps, Kokopelli USB rechargeable inflator, neoprene socks and gloves, Crocs water shoes, Mustang hybrid PFD with emergency whistle and knife. Not visible are a waterproof 3 litre deck bag, and a lightweight 40 litre drybag for all this gear that also serves as an back-up inflation bag and secondary air chamber inside the inflated raft.
8. DIY Jones H-loop handlebar harness – “Telkwa” DIY Packraft, 4-piece Werner packraft paddle, 4 Voile type straps. The raft is rolled around the paddle sections.


This simple hack takes a few minutes to install and can be moved to different bikes without tools or cutting and replacing of cable ties. Interlocking Velcro One-Wrap and adhesive backed Loop Velcro yield a sturdy mount and smooth surfaces in the bicycle cockpit. In this example the Bolt positioning is at an ideal distance and location for the progressive lenses I wear.
The method of interlocking Velcro types is widely applicable.


May 5, 2021 Episode 57 of the MyBack40Podcast. Sara and Guy chat with Steve O’Shaughnessy about Sara’s first year in the bag making business.
Here’s a link to a podcast about how products and DIY ideas emerge from the Bikepackers Foundry. Grateful that Sarah Hornby of Bikepack Canada and Steve O’Shaughnessy of MyBack40podast found this topic of interest to the community.
As one of the most requested guests for the Podcast, many of you already know who this man is. For those of you who don’t, say hello to Guy Stuart. Guy has been in the Bikepacking scene for the last handful of years and has made his presence known by participating in any event he can get his wheels into. Guy is also a passionate DIY sempster (tailor, sewer) and has manufactured most of his own luggage. In this episode, Guy discusses his passion for cycling and his analytical approach to the design and fabrication of his pieces.


February 1, 2022: This instant mashed potatoes suggestion is based on bulk quantities that can reduce or eliminate extra packaging. A 1/2 or 1 liter Nalgene bottle provides reusable dry storage of the mix, and makes it easy to get just the right amount for a quick meal. The ground chia and ginger contain ingredients that may help with both fueling and recovery. Butter and/or powdered milk can also add calories and extra flavoring.


Ingredients:
Just Real Spuds Mashed Potatoes, 2.5 kg | Costco,Buy PRANA Proactive Organic Ground Black Chia Seeds at Well.ca | Free Shipping $35+ in Canada, Egg Yolk Powder|Eggylicious (prideofindia.ca), Buy Simply Organic Ground Ginger Root at Well.ca | Free Shipping $35+ in Canada, Club House, Quality Natural Herbs & Spices, Fine Herbs, 62g : Amazon.ca: Grocery & Gourmet Food, Cello Parmesan Whisps, 269 g | Costco
Four-cheese instant mashed potatoes
This suggested meal is based on packaged Idahoan mashed potatoes available in many grocery stores. The packaged potatoes are supplemented with freeze-dried Lite House veggie mix, unsalted butter, and powdered ginger (not shown) all combined in a zip lock bag. Alternately the ingredients can be carried separately and combined at meal time. Typically yields about 700 calories (the Idahoan mix is 440 calories/bag). Pour two cups, (500 ml) of boiling water into zip-lock bag, stir completely, let stand one minute prior to eating. This meal can also be cold-soaked….not so much for the butter. 🙂
Ramen and “stuff”
Here’s a favorite bikepacking meal. Ingredients can usually be found in most grocery stores. Super easy to prepare in advance and loaded with about 750 calories. Typically costs less than $3/meal.
2 – blocks Organic millet & brown rice ramen = 480 calories (Costco product) This is sold as a gluten free product.
1 pouch of Lipton Chicken Noodle Supreme Cup-a-soup = 60 calories
1 teaspoon Litehouse freeze-dried ginger
1 tablespoon Litehouse freeze-dried poultry herb blend (both Litehouse products are usually in the refrigerated salad dressings area of grocery stores)
1 can solid light tuna packed in olive oil ˜200 calories (weight 85 grams) or substitute nuts, jerky, Hot Rods, etc.

Preparation: Break up the ramen in a bowl and then add to a 1 litre “medium” zip-lock freezer bag …. not a sandwich bag.
Combine rest of ingredients, except tuna, in bag, and seal.
When ready to “cook” add a can of tuna with the oil and then add 450 ml of boiling water, and seal bag. Wrap bag in something to keep it warm. Wait 5-15 minutes* while stirring bag occasionally to mix contents. Enjoy. *altitude dependent
Breakfast Hash
A friend highlighted Golden Griddle hashbrowns as a staple bikepacking food. Thanks Bob! These containers of dehydrated potatoes are widely available in North America. Marketed as gluten-free, the spuds are an excellent base for adding your favorite ingredients. The sodium levels of ~1,800 Mg/container are worth considering relative to your daily activities and needs. “Cooking” is as simple as adding 500 ml of boiling water to the container, stirring, and enjoying a hot beverage while the mixture rehydrates. At 1,800 metres it takes about 15 minutes for rehydration.
1/4 teaspoon Litehouse freeze-dried ginger
1 tablespoon Litehouse freeze-dried poultry herb blend (both Litehouse products are usually in the refrigerated salad dressings area of grocery stores)
1-3 tablespoons of unsalted butter.
Mixed nuts and/or shelf stable bacon bits, etc. Note: Cheeses make the mixture VERY difficult to stir and rehydrate completely.


This DIY concept is a simple cutting and sewing project to extend the functionality of a tent. A vestibule footprint can block mud and debris from entering the tent and also provides a larger barrier for moisture migrating from the ground and condensing on the inside of the tent fly. Any piece of coated fabric will work. In this example a piece of coated ripstop nylon was used. The total weight addition is 30 grams.

Design considerations: a. Size the vestibule footprint smaller than the fly to prevent water from pooling on the footprint. b. Fold and sew edges to minimize water and debris accumulations. c. Add a length of elastic cord to hold the footprint in tension.


This post is a work-in-progress documenting changes or additions made during the construction of four Telkwa packrafts purchased from the awesome folks at DIY Packraft. DIY Packrafts are extremely well designed and the kits assemble exactly as demonstrated in the excellent videos and printed instructions. My intention is to substitute the Leafield D-7 inflation/deflation valves to replace the supplied Boston valves. While heavier and more bulky my experience is that inflation/deflation is much quicker due to larger porting, are easily cleaned, and are field-replaceable without thermal welding.

There’s really only one tool that I’ve found that materially improves assembly processes. It’s a small stainless steel mixing bowl with a flat bottom slightly wider than a typical welding area. To the bottom of the bowl two parallel strips of 3M double-faced window film sealing tape are added just outside of the working area. This easily removable tape typically has enough adhesion to complete the welding of one tube segment. Removal and replacement of the two tape sections takes about a minute.
Spring 2020 – The purpose of this post is to give folks ideas about an approach to develop DIY gear for bikepacking and possibly bikerafting. Looking critically at all possible storage areas of my bikes led me to seriously examine the role that panniers could play in extending distances and multi-sport travel,*aka bikerafting. What problems might be solved by panniers that can be adjusted during the journey? Thinking ahead to possible outcomes when Covid-19 controls are reduced results in evaluating the prospect of needing to carry all or most supplies over bikepacking trips of several weeks. Ideally this could be achieved without using a backpack. Can on-bike storage be reconfigured to meet changing needs of food and bikerafting realities? These were some of the disparate thoughts rattling around as I considered prototyping more storage options for extended completely unsupported bikepacking trips.
From these ideas emerged some usage criteria: no unnecessary weight, quickly flexible, integrated with existing gear and systems, durable and without dangles, hikeabikeable, complementary to packrafting, function over form.
I then moved on to considering what gear and food might fit into different storage locations on the bike and packraft. While thinking about how this might work on a trip, the idea of significant volume flexibility emerged.
The main integration items are drybags, compression drybags, and food packaged in ziplock bags, ultralight backpack. For bikerafting the items are PFD, cold water immersion gear, inflation and repair supplies, miscellaneous packraft components. For a fairly minimalist bikepacker the list got long very quickly …
Typical 20 litre drybags* seemed like a good organizational size to start working from. This resulted in rough bag dimensions of 4 inches deep, 10 inches wide, and about 24 inches tall when open. Other integration checks included 5 and 8 litre compression drybags, ziplocks full of food, PFD, full packraft kit (raft and 4-piece paddle are carried on the handlebars). * The Sea to Summit Ultralight Drybag Backpack (a favorite of mine) is also approximately this size.
The combination of usage criteria and volume flexibility results in the Mega to Mini panniers prototype. A maximum closed volume, 4 folds, of about 18 litres with a minimum volume of <5 litres when fully compressed. When empty, each pannier is flat with no protrusions.


These are a couple of simple ways to get more efficiency out of your cooking system. The water bath also works very well for using a conventional propane/iso-butane gas stove at extremely low temperatures (below -30). Water bath – The sensible and latent heat in liquid water is used to vapourize the liquid fuel in the gas canister. It’s helpful to tip the bowl enough that air does not get trapped in the concave bottom of the fuel canister. Don’t be alarmed if you hear the fuel boiling inside the canister. As the water starts to show signs of freezing dump it out and add warmer water. The fuel will continue to consistently vapourize as you cook or melt snow. We’ve also set the stove in puddles and streams to achieve the same result. Windscreen – buy a thin flexible cutting sheet from your local shop, punch two holes near the corners of one side, cut and bend a piece of thin wire of a length to bend the cutting sheet. Lean the cutting sheet against the side of your pot to block the wind. This setup also works well with alcohol stoves.


The cutting sheet/windscreen can also be used as a stiffener inside the handlebar roll, and for serving Bikepacker’s Charcuterie. If you want to have a very reliable extreme cold weather stove system have a look at the butane to propane conversion in this blog post of various cold weather bikepacking adaptations.


